Friday, November 27, 2020

Fancy Fold: Snowman Season Double Easel Card

On Friday during FB Live, I created this super cute Double Easel Card using the Snowman Season Photopolymer Stamp Set and Snowflake Splender Designer Series Paper.


Here's another angle:


This fun-fold card is so cute but also so easy to make! So many stamp sets could work with this card!

Measurements:

  • Pool Party cardstock: 4-1/4" x 11", scored on long side at 5-1/2"
  • Thick Whisper White cardstock: 4" x 10.5", score on long side at 5-1/4" x 7-7/8"
  • Designer Series Paper, two pieces
    • 3-7/8" x 5-1/8"
    • 3-7/8" x 2-1/2"
  • Whisper White cardstock - front of card: 2" x 3-1/8"
  • Pool Party cardstock: Use Stitched So Sweetly Dies to cut rectangle measuring 2-1/2" x 3-5/8"
  • Whisper White cardstock - inside of card: 4-1/8" x 5-3/8"

If you enjoyed this post, please be sure to ....

  • follow me on Facebook and Instagram so that you too can participate in the next This or That?
  • Use this month’s host code (HX9AHXNW) on orders under $200! Orders of $75 or more will receive a free gift from me!
  • Subscribe to my YouTube Channel for paper crafting video tutorials!
  • Shop the Clearance Rack for discounts up to 60%!

Supply List

Thursday, November 26, 2020

Lovely You Card Masking Using Post-It Notes

Everyday Tuesday is Technique Tuesday! This past Tuesday I hopped on Facebook Live to show you all how to make this fun card with the card masking technique using Post-It Notes!


To create the this card, start with a piece of Whisper White cardstock measuring 4" x 5-1/4". Then mask part of your card by placing Post-It notes (painters tape would work as well) in a diagonal across your Whisper White cardstock. Shown below in a screen shot taken from the Facebook Live video is what your cardstock should look like.

Then pick out 4-5 of some of your favourite, coordinating ink pads. I used Cherry Cobbler, Garden Green, Shaded Spruce, Real Red and Mango Melody. Using one ink pad at a time, stamp along your "mask" using different images from the Lovely You stamp set, as shown in the screen shots below. 


Once you're satisfied with how it looks, carefully peel away the Post-It notes.


Next, add your sentiment into the white space left behind by your Post-It "mask."

Lastly, adhere your stamped Whisper White cardstock to a piece of coordinating cardstock measuring 4-1/8" x 5-3/8". I chose Cherry Cobbler cardstock. Then adhere the whole thing to a card base of Whisper White cardstock measuring 8-1/5" x 5-1/2", scored on the long side at 4-1/4".

To watch the FB Live Replay, click on the video below:

If you enjoyed this post, please be sure to ....

  • follow me on Facebook and Instagram so that you too can participate in the next This or That?
  • Use this month’s host code (HX9AHXNW) on orders under $200! Orders of $75 or more will receive a free gift from me!
  • Subscribe to my YouTube Channel for paper crafting video tutorials!
  • Shop the Clearance Rack for discounts up to 60%!

Product List 

Monday, November 23, 2020

Gift Wrapped Pop Up Gift Card Holder

If you weren't on Facebook this past Friday you missed out on Fancy Fold Friday Facebook Live! During the FB Live, I showed how you can make this super cute Pop Up Gift Card Holder using the Gift Wrapped Bundle and Plaid Tidings DSP.


And another angle:


This fun-fold card holds a gift card perfectly! Would be great for any occasion! Anniversary, Christmas, Birthday, .... you name it!


Measurements:

  • Cherry Cobbler Card Base: 4-1/4" x 9"
    • Cut on the long side at 5-1/4"
    • Score the large piece on the long side at 1" and 3-3/4"
    • Score the small piece on the short side at 1-1/2"
  • Optional: emboss both pieces that make up your card base
  • Whisper White Cardstock inside layers:
    • Cut one piece that measures 2-1/2" x 4"
    • Cut a second piece that measures 2" x 4"
  • Plaid Tidings DSP Belly Band: 1-3/4" x 6"

Catch the replay below:


If you enjoyed this post, please be sure to ....

  • follow me on Facebook and Instagram so that you too can participate in the next This or That?
  • Use this month’s host code (HX9AHXNW) on orders under $200! Orders of $75 or more will receive a free gift from me!
  • Subscribe to my YouTube Channel for paper crafting video tutorials!
  • Shop the Clearance Rack for discounts up to 60%!


Thursday, November 19, 2020

Merry & Bright Online Extravaganza 2020!

Are you just about ready to start your Christmas countdown? The big day is only weeks away, which means you're probably starting to think about your holiday paper crafting plans. Perhaps you’d like to make an advent calendar, create some handmade décor, or prep some scrapbook pages. The possibilities are truly endless! 

And since the busiest shopping season is going on now, this is the perfect time for our Merry & Bright Online Extravaganza!

For one day and one day only on November 24th, enjoy 10% off select annual catalog items! I'm sure you know that adding a personal touch to the holidays can make the season even more meaningful and fun. So make sure you take advantage of this fabulous sale so you can do your part to make the world a more beautiful place this Christmas season!

Click here for a list of exclusions.


If you enjoyed this post, please be sure to ....

  • follow me on Facebook and Instagram so that you too can participate in the next This or That?
  • Use this month’s host code (HX9AHXNW) on orders under $200! Orders of $75 or more will receive a free gift from me!
  • Subscribe to my YouTube Channel for paper crafting video tutorials!
  • Shop the Clearance Rack for discounts up to 60%!


Wednesday, November 18, 2020

Press On for #GDP267

This week I decided to join the Global Design Project #267! The theme this week is all about Hot Drinks! And my favourite Hot Drink is coffee!


I began making this card by selecting three ink colors that worked extremely well together. I decided on So Saffron, Rococo Rose, and Petal Pink.

Then I pulled out some coordinating cardstock and designer series paper in the same color pallet. I also pulled out some black and white cardstock because these two basic colors pair well with most (if not all) color combinations.

I began with my card base. I chose Petal Pink Cardstock and cut a piece measuring 8-1/2" x 5-1/2"; I scored it on the long side at 4-1/4".


Next, I created a mat for my card base. I cut a piece of Rococo Rose Cardstock measuring 4-1/8" x 5-3/8" and another piece of Whisper White Cardstock measuring 4" x 5-1/4". 

I took the row of coffee cups from the Press On Stamp Set and stamped the image repeatedly onto the Whisper White Cardstock using Petal Pink Ink to create my own Designer Series Paper. I adhered this homemade DSP to the Rococo Rose Cardstock and then glued them both to my card base.


Next, I took a piece of So Saffron Cardstock measuring 3" x 4-1/4" and I tore off two adjoining sides to create a fun rustic effect on my card. I glued a piece of So Saffron spotted DSP from the Subtles Designer Series Paper pack onto the remaining untorn, long edge. I attached this to my card using dimensionals.

I then grabbed my Rococo Rose Dark Stampin' Blend Marker and flicked the brush end on the cap toward my So Saffron Cardstock attached to my card to get the splatter technique you see in the pics.

Once my card base was finished, it was just a matter of decorating it! I stamped two coffee cups onto Whisper White Cardstock and another two onto Petal Pink Designer Series paper. I fussy cut out my coffee cups from the white cardstock and fussy cut out just the sleeves from the DSP. I glued the two together, and added a heart to the sleeve. I placed some Polka Dot Tulle Ribbon on the card base and attached the coffee cups on top using dimensionals to hold the ribbon in place.


Lastly, I stamped my greeting on some Basic Black Cardstock with VersaMark, added some White Stampin' Emboss Powder, and heat set it with my heat tool. I rough cut out the greeting, adhered it to my card using dimensionals and then add a few rhinestones for some bling!

What do you think?! I had so much fun making this card and can't wait to participate again in the next Global Design Project!
If you enjoyed this post, please be sure to ....

  • follow me on Facebook and Instagram so that you too can participate in the next This or That?
  • Use this month’s host code (HX9AHXNW) on orders under $200! Orders of $75 or more will receive a free gift from me!
  • Subscribe to my YouTube Channel for paper crafting video tutorials!
  • Shop the Clearance Rack for discounts up to 60%!


Monday, November 16, 2020

Menagerie Mix-Up Bridge Fold Card

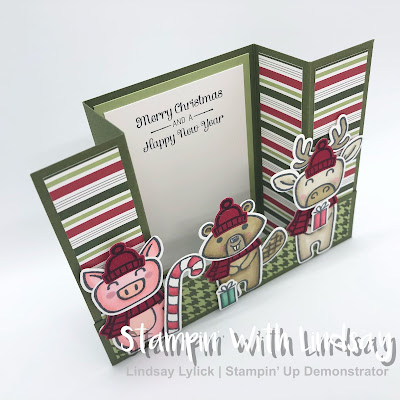
If you weren't on Facebook on Friday you missed out on Fancy Fold Friday Facebook Live! During FB Live, I showed you how you can make this super cute Bridge Fold Card using the Menagerie Mix-Up Bundle, Itty Bitty Christmas Stamp Set and Heartwarming Hugs DSP.

Here's a different angle:


This card folds flat so it can fit in a medium envelope! How cool is that?!

It was so easy to make too! The key was to glue the "bridge" to the outer panels on the far right and left of the card base to allow the card to sit right. Such a cool card layout! 


Measurements:
  • Mossy Meadow Card Base: 4-1/4" x 8"
    • Score on the long side at 1-1/4", 2-1/2", 5-1/2", and 6-3/4"
  • Heartwarming Hugs DSP
    • 4 pieces for the vertical panels: 1" x 4"
    • 1 piece for the bridge: 1" x 5-1/4"
  • Mossy Meadow Bridge: 1-1/4" x 5-1/2"
  • Pear Pizzazz Layer: 2-3/4" x 4"
  • Whisper Whiter Layer
    • Front: 2-1/2" x 3-3/4"
    • Back: 2-3/4" x 4"

If you enjoyed this post, please be sure to ....

  • follow me on Facebook and Instagram so that you too can participate in the next This or That?
  • Use this month’s host code (HX9AHXNW) on orders under $200! Orders of $75 or more will receive a free gift from me!
  • Subscribe to my YouTube Channel for paper crafting video tutorials!
  • Shop the Clearance Rack for discounts up to 60%!


Supply List